 We were somewhat surprised at the weight of the four station cetop 3 manifold we ordered from Bosh. The unit weighs 6.7Kg, and as we have seven of them on our machine, that's 46.9Kg of manifold! So I started to look for an aluminium alternative. Our Bosh rep told me that they don't stock alu versions because the don't work so such high pressures as the cast iron version, however, seeing as we are only at 160 bar, this shouldn't be an issue. I managed to find an aluminium version of the exact manifold we have made by Macabor. I also found a pretty good price of £89 each, however, after some further investigation I found the Uk distributor for Macabor, and picked up seven of these aluminium manifolds for £47 each! Well happy with that, saved over £200 pounds and the combined weight of the alu version is 18.9Kg, saving 28Kg from the machine weight.. not to be sniffed at! :)
Monday 30 November 2009
Spot the difference!
We were somewhat surprised at the weight of the four station cetop 3 manifold we ordered from Bosh. The unit weighs 6.7Kg, and as we have seven of them on our machine, that's 46.9Kg of manifold! So I started to look for an aluminium alternative. Our Bosh rep told me that they don't stock alu versions because the don't work so such high pressures as the cast iron version, however, seeing as we are only at 160 bar, this shouldn't be an issue. I managed to find an aluminium version of the exact manifold we have made by Macabor. I also found a pretty good price of £89 each, however, after some further investigation I found the Uk distributor for Macabor, and picked up seven of these aluminium manifolds for £47 each! Well happy with that, saved over £200 pounds and the combined weight of the alu version is 18.9Kg, saving 28Kg from the machine weight.. not to be sniffed at! :)
Thursday 26 November 2009
Can-Tainer Lid
 I machined up a lid for the Can-Tainer today, looking pretty good I think! I struggled to find a good chassis mount RJ45 connector, so I had to use this somewhat oversized bucaneer type socket, however, it would be pretty good for the final version, as it is IP67 rated when used with the matching connector. On the final version I will loose the DB9 and VGA connector so the whole unit should be IP67 rated.
Wednesday 25 November 2009
3 Phase installed
 3 Phase power has been installed today, now we can get on and test the pump :), although we can only run it for a second or two, as we have no oil in the reservoir yet, only a bit left in the pump from the manufacturers test.
Waterjet CNC cut aluminium parts.. Attemp Two!
 Josh takes a look at the re-cut parts that have just arrived, they are in a different league to the first batch, some of which we still have and will use. The edges on these are within 0.1mm as was originally suggested, and they are parallel! very nice, our guess is that they re-calibrated the machine??
Take a look at the finish on this piece, its very good for water-jet!

Tuesday 24 November 2009
Pump Wireing & Control
 I have started to wire up the DOL and control panel for the hydraulic pump. I have added an Start/Stop button to the control panel, this controls the pump to tank solenoid valve which shorts out the supply in its off state. Once the motor is started, the solenoid can be switched on using the start button which ports the pump to the main output connector. If there is a loss of power or the stop button is pressed, the solenoid switches back to the off position until start is pressed again.
Should be getting 3 phase installed later in the week so I can test things out!
Friday 20 November 2009
The Mantis Brain
I have the PC-104 stack built with the Vortex86DX core for the brain of the Mantis. I have added an 8 port RS485 transceiver board with baud rates of up to 921.6Kbps, I don't need all eight ports, at least no yet, but it was the only board I could find that had the high baud rate capabilities, at a reasonable cost. The Vortex board will only go to 460.8Kbaud.
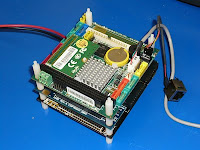 Installation of the serial baord in Linux was a little fiddly, but thats brobably due to my lack of Linux knowledge. Currently I only have a single port running on the 8 port board, well actually I can have any of the eight ports, but only one at a time. So that's good enough for now!
At the bottom of the stack is a PC-104 PSU, that takes 12 to 30V and delivers 5V to the stack.
I have placed the stack in an old CanTainer I had, but I will purchase a new CanTainer for the final unit, and machine the case tops with the appropriate connectors.
 Installation of the serial baord in Linux was a little fiddly, but thats brobably due to my lack of Linux knowledge. Currently I only have a single port running on the 8 port board, well actually I can have any of the eight ports, but only one at a time. So that's good enough for now!
At the bottom of the stack is a PC-104 PSU, that takes 12 to 30V and delivers 5V to the stack.

I have placed the stack in an old CanTainer I had, but I will purchase a new CanTainer for the final unit, and machine the case tops with the appropriate connectors.
Thursday 19 November 2009
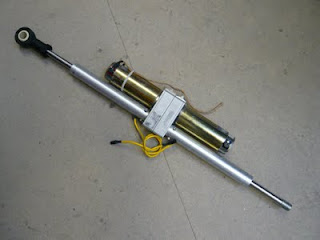
Hydraulic Power Pack Arrives
 Ahead of schedule our three phase hydraulic power pack arrived today :) This power pack will be used for the test leg, and no doubt will come in very usfull during hydraulic commisioning. It could also be used to run the hexapod without the on-board engine, just for body moves, but wouldn't have the grunt for any serious walking. The pack is a 7.5Kw three phase unit, delivering 150bar at 29lpm. My next job is to hook up a DOL starter for the motor, along with an E-stop and interlock unit to control the on-board dump valve. This will allow for off load starting of the motor, along with the additional safety.
Next week we will get a single 32amp three phase socket installed in our unit, the pump only requires a 16A socket, but we may as well get a 32 installed just in case.
P.S. I know it looks like Josh is always doing all the work.. but some one has to pick up the camera, and its usually me, honest!

Wednesday 18 November 2009
Test leg coxa chassis
The coxa chassis is close to being finished. This is one corner of the chassis, which we are using to mount our test leg to. For some reason it seems a little small when you think about sitting at the fron with a leg so close either side!!


Our first hydraulic valves
 We have just received the first of out hydraulic valves from Rexroth, very nive they are too! We have two 4WREE and two 4WRPE type valves. We are hoping the 4WREE valves will be good enough, as they are a bit cheaper then the latter type. These four valves will be used on our test leg rig.
Tuesday 17 November 2009
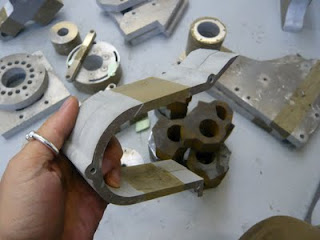
Waterjet CNC parts... somethings not right!
It appears that there is a problem with all of our water jet CNC cut parts :(
We had the 25mm 5083 aluminium and 1.75" steel parts cut with a dynamic head water jet CNC machine. The dynamic head is supposed to keep the sides of the material within 0.1mm of square to the face. Without the dynamic head there is a much bigger draft angle.
However, it seems some of the edges on our parts are within 0.1mm, while others are up to 0.5mm! Having taken a close look at the parts, it looks as though the cutting head was misaligned in either the X or Y axis, causing this error throughout the cutting process. This error was further compounded by the steel material being poorly clamped during the cutting process and not being held flat.
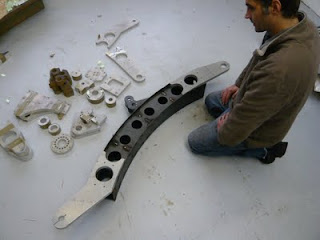
Having spoken to the water jet company, they have agreed to re-cut the parts, so today much to Josh's disappointment we packed up all the parts and sent them back. We need to start a new shelf of shame, labelled "Shelf of Others Shame!". :)
We had the 25mm 5083 aluminium and 1.75" steel parts cut with a dynamic head water jet CNC machine. The dynamic head is supposed to keep the sides of the material within 0.1mm of square to the face. Without the dynamic head there is a much bigger draft angle.
However, it seems some of the edges on our parts are within 0.1mm, while others are up to 0.5mm! Having taken a close look at the parts, it looks as though the cutting head was misaligned in either the X or Y axis, causing this error throughout the cutting process. This error was further compounded by the steel material being poorly clamped during the cutting process and not being held flat.
Having spoken to the water jet company, they have agreed to re-cut the parts, so today much to Josh's disappointment we packed up all the parts and sent them back. We need to start a new shelf of shame, labelled "Shelf of Others Shame!". :)
Monday 16 November 2009
The first movment..
Well, the first movement on the Mantis just happened, and for a start I guess it wasn't too bad! Admittedly this is under electrical control, not hydraulic, but still, its good progress.
 The PID filter seems to be working pretty well, although as I found out its not a good idea to leave power switched off to the motor amplifer, and leave the FACU running, allowing the integrator to wind up.. when power is restored to the motor amp, you can guess what happens.. and boy does it happen fast!! ahem, partly operator error, and partly badly tuned PID.
The back to back actuator arrangement works ok, but as you can probably guess they tend to get out of sync with each other, which doesn't help, so I may have to go back to single unit.
Electrical test leg complete.
Josh finished the electrical test leg today, so now I can get on and test the FACU controller, however, there is allot of slop in the Igus bearings on the joint.. still waiting for a reply from Igus on this matter, but as it is its not good enough. There is also some miss-alignment of the rotary encoders, but this could have been a drawing error?

Tibia joint with electrical test actuator in place.


Tibia joint with electrical test actuator in place.

Friday 13 November 2009
Terrain simulation
On a slightly brighter note, after two days of gloom and staring at my HexEngine code, I have made some progress on some additional reflexes in the terrain adaptation of the hexapod, which I have been simulating within Webots. Still have a long way to go.. but it is progress!
Also I reduced the simulated weight and torque of the machine by half, which has helped the sinking issue.
Just been taking a look at MCA2, looks like an interesting machine control/interface system, may take a closer look to see if it would be suitable to convert/port the HexEngine, however this would probably be a massive task that I should probably leave to a later date.
Sloppy bearings :(
Josh has been using our new boring tool today, to bore the holes for the Igus bearings to H7 tolerance. First of all it turns out the cutting tool supplied is the wrong type, so the cutter is chattering and making a mess of the H7 finish!
 Then when we do get one of the bearings in place, nice tight fit.. the 30mm anodized shaft also supplied by Igus, has about 0.1 to 0.2mm of slop around it. In fact the hole looks as though it is oval shaped, which we were told would be squashed into a tight round fit on the aluminium shaft once the bearing was pressed into an H7 fit.. hmmm, not the case! Hopefully we will get an answer from one of the tech. chaps at Igus next week.
Well I guess it is Friday the 13th!
Tuesday 10 November 2009
Slow sinking robot..
 I have continued to update the Webots simulation model, including setting the correct joint torques and weight for leg components and body. I thought it would also be good to simulate the ball joint foot at the bottom of the metatarsus.
I have this all running now, including contact sensors which are fed back to the HexEngin via a TCP packet, so that terrain adaptation can be simulated. This worked surprisingly well, until I added the ball joint linkage, it seems to have slowed the simulation down to running at 0.2 x real time. This causes problems with contact feedback to the HexEngine, and the hexapod gets into an oscillating shuffle! I have experienced this in real machines before.. and its usually to do with contact sensor problems or leg speed tuning.
I can remove the ball joint at the end of the metatarsus, but its a bit of a shame, as I wanted to use the angle of the joint to simulate ankle joint position errors. I will post on the Webots forum to see if there is a solution, without purchasing a faster machine ( Currently dual Xeon 2.66Ghz, 4Gb )
 The sinking issue: Having made the robot the correct weight, approximately 1600Kg, it now sinks into the floor by about 100mm. II have tweaked various settings in the simulator, including making the feet cubes instead of cylinders which apparently helps, however, this is apparently a feature of the physics engine, so I will have to put up with it, or reduce the weight of the machine for the simulation.
One encouraging point is that the machine was able to stand up at full weight :) which confirms our previous calculations and power requirements. We are aiming for a body weight of approximately 800Kg, the simulation seemed happy with a weight of 1200kg.
Monday 9 November 2009
PID Valve driver (FACU) test rig..
I need to test my PID valve driver (FACU unit) and it will be a while before the hydraulic components and power pack arrive for our test leg, so we decided to rib up an DC linear actuator to the tibia joint of the test leg. I have taken the 4-20ma output of the FACU unit used to drive the hydraulic servo valves, and converted it into a voltage suitable for a 6/12 amp servo driver I had in my spares box. I will fix the feedback of the servo driver into mid voltage 12ma position so the driver behaves only as an amplifier in open loop mode, then the FACU will close the loop with the absolute encoder on the tibia joint.
Fortunately I had a couple of ultra motion bug actuators left over from an old job. These are powerfull units, with 6" throw each, so to get a bit more range out of them, we join them, back to back and run two together to give 12" throw. We did this once before on one of the Harry Potter films for the Dragon animatronic, usually you would buy an actuator with a long throw, however, we had to use old stock, so this was the best soloution. The two ultra motion actuators back to back are almost the same length and throw as our tibia hydraulic ram, so this should give us a good representation of how FACU behaves!
Josh is working to get this electrical test rig up and running.. as you can see by his work area :)

Friday 6 November 2009
Waterjet CNC cut aluminium parts..
Our delivery of waterjet cut 25mm 5083 aluminium turned up today :) This was cut using a dynamic head system which nearly eliminates the flare angle of the cut often associated with this cutting method.

The finish is really good, although some of the holes are a little baggier than they should be. We were told if anything the holes would be under size, but that isn't the case with all of them. For the next batch we will alter the drawings to reduce the critical holes size so they are definitely cut under size, and finish them ourselves.
The top and bottom aluminium femur parts are a pretty good fit into the main steel femur section.

The finish is really good, although some of the holes are a little baggier than they should be. We were told if anything the holes would be under size, but that isn't the case with all of them. For the next batch we will alter the drawings to reduce the critical holes size so they are definitely cut under size, and finish them ourselves.

The top and bottom aluminium femur parts are a pretty good fit into the main steel femur section.

Thursday 5 November 2009
Tourmach up and running..
The Tourmach is installed and running. Now we have the workshop set-up pretty well, I suppose we had better start making something ;) In fact we would have started today, if it wasn't for the fact that our 25mm water jet aluminium parts were sent to the wrong address!


Webots simulation update.
I have taken a look at the webots simulation I started 2 months ago. Its been a while, so it took a bit of head scratching and many cups of tea to get back to where I was, however, the last thing I remember I needed to do was to figure out if I could use the standard £300 version or would I need the Pro £3000 version! Fortunately I have found I can use the standard edition, which is great! I will purchase a copy as soon as my demo version runs out in 30 days or so.
When I first built the hexapod model, I created it as a supervisor, instead of a robot model. I think the reason I did this as because I thought I would need supervisor functionality, which requires the pro edition. As it happens I don't, and I found a simple way to convert my existing world file with supervisor model into the robot model, by editing the world text file :)
I have also got contact sensors working on the simulation hexapod, this means I can send contact information back to the HexEngine so I can properly simulate terrain adaptation. I need to check if the standard version does allow shaped terrain??
Wednesday 4 November 2009
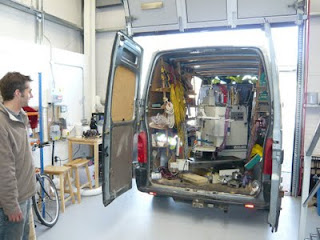
Installing the Tourmach CNC Mill
We have spent the day removing Josh's Tourmach Mill from his workshop in Chesham. Pretty hefty bit of kit, we tried lifting it on our trust engine hoist.. on the 1/2 tonne position, Josh thought it weight under 1/2 tonnes. Engine hoist wouldn't budge it, turns out it weighs 600kg!. Well at least now we know. Bit of a faff getting it into the back of the van, but no damage done and we both still have all our toes!! must get some steel toe caps.
The most useful bit of kit in our workshop so far.. the engine hoist :)


The most useful bit of kit in our workshop so far.. the engine hoist :)

Monday 2 November 2009
Back to work!
Having had last week off, both Josh and I are back to work. The first of our hydraulic components arrived today, nothing to exciting: A manifold and a check valve, however, the size of the check valve was a bit of a surprise! gulp!


Subscribe to:
Posts (Atom)